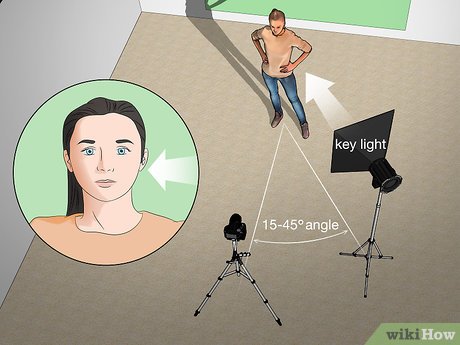
The Canon EOS 5D is a 12.8-megapixel digital single lens reflex camera body that was announced on 22 August 2005. It is priced lower than the EOS 20D as well as the EOS-1D Mark II (and EOS-1Ds Mark II) cameras. It can accept EF-M mount lenses. Among its most notable features are Dual Pixel CMOS AF and High Density Reticular AF systems.
Dual Pixel CMOS AF system
Dual Pixel CMS AF is a new technology used by the Canon 5D. Phase-detection still remains a popular technique. Dual Pixel CMOS is a technology that uses two independent readouts to each pixel in order to process millions and produce a smooth focus effect. Phase-detectionAF is great for viewing through the eyelevel viewfinder. Dual PixelCMOSAF takes it to another level. This AF system is capable of three things:

High Density AF system with Reticulars
Dual-line sensors provide superior focusing performance for all shooting conditions. The 61 point high-density, reticular-AF system has dual-line sensors. The camera will adjust focus according to the light source, regardless of whether the subject appears in focus. This technology is also available for Single Point AF and Single Point Spot AF.
24-105 mm lens
The Canon 5D Mark IV is a top-end camera that features a 24-105mm lens and exceptional low-light performance. The powerful 4K video and still photography camera comes with a brand new 30.4 MP full-frame sensor CMOS sensor and DIGIC 6+ image processing. The combination of these three aspects yields photos with excellent balance between fine detail and resolution, sensitivity, and low-light performance.
Rolling shutter
Although the Canon 5D roll shutter is not new technology but has been rumored since a while. It is the same technology used in the Canon F55 camera, making it an excellent upgrade for 5D. The rolling shutter would be a great feature to make a camera more user-friendly and more affordable than its predecessors. Canon is well-known for not innovating very much in recent decades, but this new technology may be worth your consideration.
4K video recording
The Canon 5D Mark IV DSLR features a wide range of innovative features, including 4K Video Recording. The camera's new 30.4-megapixel dual-pixel sensor increases the size of stills to 6720 x 4480 pixels. Dual-pixel sensors are great for videography because they let the camera take two images at the same time with slightly different focus points. Post-processing can combine the two images.
FAQ
How do I get started with digital photography?
First, you need to decide what type of camera is best for you when you first start digital photography. There are many options: DSLRs (digital Single Lens Reflex Cameras), point-and–shoot compact cameras or camcorders. Each has its own benefits and features. DSLR cameras can produce high-quality images, but they are usually heavier and more bulky than other types. Point-and-shoot cameras are smaller and lighter and often include automatic settings for certain situations. Camcorders offer excellent video recording capabilities, and may also have still photo shooting modes. Smartphones are lightweight, portable, and light. They offer excellent image quality, advanced features, such as GPS mapping, music playingback, and Internet browsing.
Once you've made a decision about the type and model of camera you want, then you must decide whether you want to buy it new or used. Cameras that have been used in recent years can often be found for a reasonable price. Because manufacturers invest large sums of money in developing new technology, new models tend to be more expensive.
Next, you need to purchase lenses. Lenses are crucial in determining the quality and appearance of your photos. They let you adjust the focal length to zoom in and out of the scene, without losing focus. Some lenses have built-in flash units, while others require external flash units. There are many brands that offer a wide variety of lenses, each with its own unique characteristics.
You will also need memory cards. Memory cards store pictures taken by your camera. It can hold hundreds to thousands of photos, depending on how big your card is. You will need multiple memory card if you plan on taking many photos.
Light Room can be used to enhance your photographs.
Start early to get the best photos possible for your project. It's always better to take as many shots as possible and then pick the ones that will give you the most bang for your buck.
Lightroom makes it easy to do this. It lets you see how different settings impact each photo. You can also adjust these settings on-the-fly without going back into Photoshop. This lets you quickly experiment with what looks great and what doesn't.
Which Lenses Do I Need?
The most common question beginners ask is, "what lens should I buy?" This is a difficult decision because there are so many options.
The good news? You don’t have to purchase a completely new lens for every new camera you buy. Instead, you can add lenses later on.
These are just three options for lenses that you might consider.
-
Wide Angle Lens: 14mm - 24mm: These lenses provide a wide angle of vision, which allows you to capture more details of your subject. Zooming in can be done without affecting image quality.
-
Normal/Standard Zoom Lens (28mm to 70mm) : These lenses allow you the flexibility of changing focal lengths, while still maintaining high quality images.
-
Telephoto Zoom Lens (70mm-200mm): These lenses can be used to capture distant subjects. These lenses allow you stay focused on your subject even when they appear small.
These lenses can also be combined to produce different effects. For example, you could use a normal lens to shoot close-up details and switch to a telephoto lens to capture far away objects.
What camera is best for beginners and what are the pros and cons?
The best camera for beginners depends on your budget, needs, and skill level.
A point-and-shoot camera is a good option if you want to save money. These cameras offer good quality but aren't very versatile.
The Digital Single Lens Reflex (Digital DSLR) camera allows you to interchange lenses, allowing you to take different kinds of photos. These are typically more expensive than point-and-shoots, but they provide much greater flexibility.
A beginner's kit is the best place to begin if you are new to photography. The package includes everything you need: a camera, lens, memory cards, tripod, flash and a camera body.
Do not forget to get extra batteries!
Statistics
- The second easiest way to get blurry photos 100% of the time is to use a cheap filter on the front of your lens. (photographylife.com)
- Get 40% off Adobe Creative Cloud(opens in new tab) (creativebloq.com)
- This article received 13 testimonials, and 100% of readers who voted found it helpful, earning it our reader-approved status. (wikihow.com)
- In this case, 100% of readers who voted found the article helpful, earning it our reader-approved status. (wikihow.com)
External Links
How To
How to take pictures in low lighting conditions
Low-light photography refers to taking photos in dimly lit or dark environments. It requires special equipment and techniques. The main challenges are controlling exposure, white-balance, and sharpness. Low light photography can be divided into two categories: ambient and flash. Flash photography works well when there is sufficient light around you. You will need a flash if you don't have enough natural light. A flash might be necessary if you are photographing a subject indoors and outside. You can also shoot at night when the moon is shining. You will get beautiful shadows and colors. Another option is to shoot during twilight. Twilight is the time when the sun has set and there's still daylight.
Long exposures may be something you want to explore. Long exposures allow you to record images after the shutter has been open for several minutes. If the shutter is closed, the camera records only the light that falls onto the sensor. This light falls onto the sensor even after a long exposure. The shutter was not opened, so no new light entered the lens. The result is that there is very little movement. To ensure clear images, disable any autofocus and exposure settings. Also, make sure that you adjust the ISO setting before you start shooting. An ISO setting of 200 will give you more control over the brightness or darkness of your image. Once you are ready to click the shutter button, make sure it is fast. This will cause the shutter to close completely. Then, you should hold the shutter button until the last possible second. You will prevent additional light from entering your camera by keeping the shutter button down. Once you take the shot, wait a while before you release the shutter. This allows your camera to process the picture. You can view your photos while you wait on the camera. Save them once you are satisfied with them.